

Last Updated on December 12, 2024 by James R. Cole
A first aid security guard plays a critical role in saving the life of an injured person. It is essential to take appropriate measures to ensure the victim’s condition does not deteriorate.
By wisely applying the techniques learned during first aid training, security guards can provide effective and timely assistance. This lesson will guide you through the proper methods and steps to handle medical emergencies confidently and efficiently.
What is a First aid security guard?
A first aid security guard is a qualified person who is trained to treat the wounded at the initial stage to prevent the situation of casualties from becoming worse.
What are the first aider’s responsibilities?
While a first aid security guard has several responsibilities at the scene of an injury, the primary duties include: ABC
A = Checking Airway
To ensure the airway of the victim is clear, follow these steps:
- Inspect for Obstructions
- Carefully check for any visible objects obstructing the airway.
- Position the Casualty
- Place the casualty on their back to ensure a stable position.
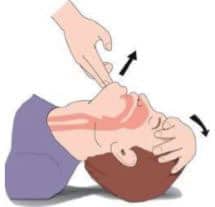
- Open the Airway
- Gently tilt the head back and lift the chin to open the airway.
- Clear Blockages
- If obstructions are present, use a sweeping motion with your fingers to remove them carefully, ensuring the object is not pushed further into the airway.

What is AVPU?
If you determine the consciousness of the casualty it helps you to make decisions for further treatment. AVPU is the method of checking the level of consciousness of the casualty. The full form of the AVPU is;
- A = Alert – is the casualty moving or talking? If no, proceed next step “V“
- V = Voice – Has the injured responded to your voice? If no, proceed to “P”
- P = Pain – Does the casualty respond to minor pain caused by you? E.g., flick the eyeball or rub the sternum with knuckles. If no, proceed to “U”
- U = Unresponsive – Assume that the casualty is unconscious and unresponsive
For a serious injury, it is important for the active emergency response, because, the time of qualified medical present is a factor in the survivability of the casualty. So, as a security guard, you have to do the following things at the scene of critical injury.
-
Shout and Send for Help
- Call out for assistance to attract attention and get additional help.
-
Contact Local Emergency Services
- Contact emergency services immediately to ensure professional medical help arrives as soon as possible.
-
Stay with the Casualty
- Never leave a casualty who is not breathing or has suffered cardiac arrest. Continue providing basic life support until professional help arrives.
B = Checking Breathing.
To assess if the casualty is breathing normally, follow these steps:
-
Look, Listen, and Feel
- Look: Observe the casualty’s chest for any rise and fall, indicating normal breathing.
- Listen: Place your ear close to the casualty’s mouth and nose to hear the sound of breathing.
- Feel: Place a hand on the casualty’s chest to feel for movement associated with breathing.
-
Timeframe
- Take no longer than 10 seconds to complete this assessment.
If the casualty is not breathing or breathing abnormally (e.g., gasping), proceed with immediate life-saving measures such as CPR while calling for emergency assistance.
C = Checking Circulation.
If the casualty is not breathing and shows no signs of life, follow these steps to assess circulation and provide life-saving measures:
-
Check for Signs of Circulation
- Look for movement, coughing, or other signs of life.
- If no signs are present, begin CPR immediately.
-
Perform CPR (Cardio-Pulmonary Resuscitation)
- Chest Compressions: Provide 30 chest compressions. Place your hands on the center of the chest and press firmly and quickly, allowing the chest to rise fully between compressions.
- Rescue Breaths: After 30 compressions, give 2 rescue breaths by tilting the head, lifting the chin, and blowing air into the casualty’s mouth until you see the chest rise.
-
Use an AED (Automated External Defibrillator)
- If possible, send someone to retrieve an AED.
- Follow the device’s instructions to apply a shock if needed.
-
Continue the Cycle
- Repeat the cycle of 30 compressions and 2 breaths until emergency medical help arrives or the casualty shows signs of life.
Providing effective CPR and using an AED can significantly increase the casualty’s chances of survival in a life-threatening situation.
How to Conduct CPR on Children?
Performing CPR on a child is slightly different from adult CPR. Here’s how to do it safely and effectively:
-
Open the Airway
- Gently tilt the child’s head back to open their airway. Be cautious not to overextend the neck.
-
Provide Rescue Breaths
- Make a seal with your mouth over the child’s nose and mouth (or just the nose for older children).
- Blow gently for 1 second, ensuring the chest visibly rises. If the chest does not rise, recheck the airway and try again.
-
Chest Compressions
- Use 2 fingers (for infants) or one hand (for small children) to provide compressions in the center of the child’s chest.
- Perform 30 compressions, pressing down about 1/3 the depth of the chest, at a rate of about 100-120 compressions per minute.
-
Continue the Cycle
- Alternate between 30 chest compressions and 2 rescue breaths.
- Continue CPR until emergency medical help arrives or the child shows signs of life.
Notes:
- For children older than 1 year but smaller than a typical adult, use one hand for compressions.
- Always be gentle to avoid causing harm to the child’s delicate bones and tissues.
What is Primary care?
Primary care is the collection of acts that the first aider carries out to provide basic life support (BSL)
What is an Automated External Defibrillator (AED) and how to use it?
AED is an electrical stimulation machine to the heart that attempts to trigger a normal rhythm. By using it, increases the chance of survivability of the cardiac arrest patient. It is very simple to use and follow the following instructions once you turn it on.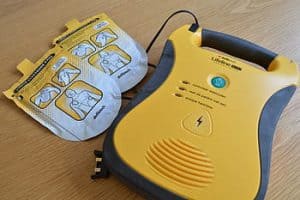

- Exposing the casualties to‟ bare chest
- Placing adhesive pads onto the chest
- The AED will analyze the casualty’s heart rhythm
If the AED determines that a shock is required, it will automatically charge up and tell you when to press the button to deliver the shock.
Once the shock has been delivered, the AED will prompt you to check for normal breathing and heartbeat. If not, you will be reminded to resume CPR.
What are the safety precautions for using AED?
- Do not touch the casualty while the AED is analyzing the heartbeat – this will interfere with electrical signals.
- Be aware of water when using the AED, for example at a pool or in a bathroom – This presents an electrocution hazard.
What is the Recovery Position?
The recovery position is used to keep the airway open and maintain normal breathing in unconscious casualties. It prevents choking and allows for easier monitoring until medical help arrives.
Steps for Placing an Adult in the Recovery Position:
-
Kneel Next to the Casualty
- Position yourself beside the injured person for easy handling.
-
Position the Nearest Arm
- Place the arm closest to you across their body, palm facing upward.
-
Position the Far Arm
- Take their other arm and place it across their chest, with the back of their hand resting against the cheek nearest to you. Hold this hand in place to support the head.
-
Lift the Far Knee
- Bend the knee farthest from you, lifting it until the foot is flat on the ground.
-
Roll the Casualty onto Their Side
- Gently pull the bent knee towards you to roll the person onto their side, ensuring their airway remains open.
Recovery Position for a Baby:
For babies, the recovery position requires careful handling due to their smaller size and fragility. Follow these steps:
-
Ensure Normal Breathing
- If the baby is breathing normally but unresponsive, position them correctly to maintain an open airway.
-
Place the Baby in Your Arms
- Hold the baby securely in your arms, keeping their head tilted downward. This position ensures their airway stays open and prevents choking.
-
Seek Immediate Medical Support
- Call for emergency assistance right away to ensure professional help is on its way.
Conclusion: Every workplace may have a team of first aid providers but the security guards should know some initial life-saving technic. The First Aid Security guard responsibilities can be various but the most common are dealt with by ABC as I have mentioned above.


Thank you for your shening. I am worried that I lack creative ideas. It is your enticle that makes me full of hope. Thank you. But, I have a question, can you help me? https://accounts.binance.com/en/register?ref=P9L9FQKY